IES stands for Illuminating Engineering Society. IES standard file format was created for the electronic transfer of photometric data over the web. It has been widely used by many lighting manufacturers and is one of the industry standards in photometric data distribution. An IES file is basically the measurement of distribution of light (intensity) stored in ASCII format. You can think of it as a digital profile of a real world light. In 3D software like 3DS Max it can be used for creating lights with shapes and physically accurate form.
IES light files are created and provided by many major lighting manufacturers and if requested via email most companies will provide them but in many cases the files are available online. PowerJolt Distribution offers IES files by request.
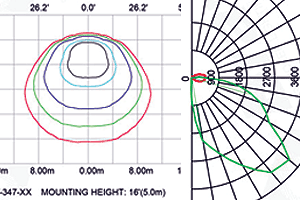
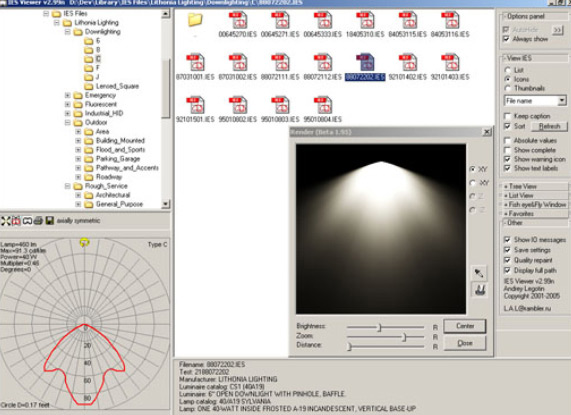
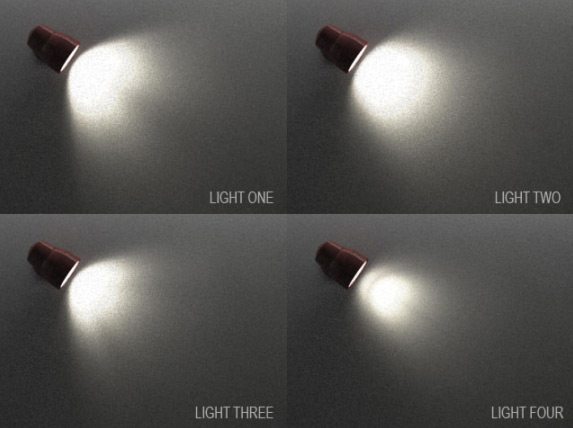
You can use an IES Viewer to view these files in a diagrammatic representation for easy understanding, which PowerJolt provides the “diagrammatic representation” which needs to be carefully filed and accessible to clients.
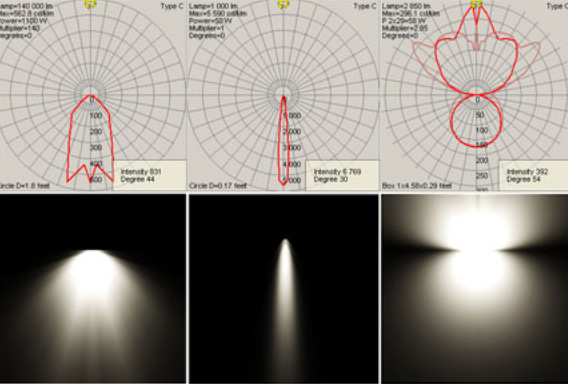
There are lots of such viewers out there but their is one by Andrey Legotin. It is the most well programmed IES Viewer with a Render option that shows you how a particular light would look. Download from here
IES in 3ds Max
3ds max is one of the 3d software around which supports the use of IES lights. There are two built in IES Lights in 3ds max under the Photometric Lights panel. They are IES Sun & IES Sky. IES Sun is a physically-based light object that simulates sunlight whereas IES Sky simulates atmospheric effects on skylight. For more about these two lights, you can refer to the 3ds max documentation. 3ds max also allows you to use external IES files through its Photometric Web feature. A Photometric Web is a 3D representation of the light intensity distribution of a light source. This lets you create lights with accurate intensities as per the recorded light profiles.
Tutorial
This tutorial will teach you how to use IES files in your scenes. You need to have a basic understanding of 3ds max workflow and at least one IES file with you to complete this tutorial.
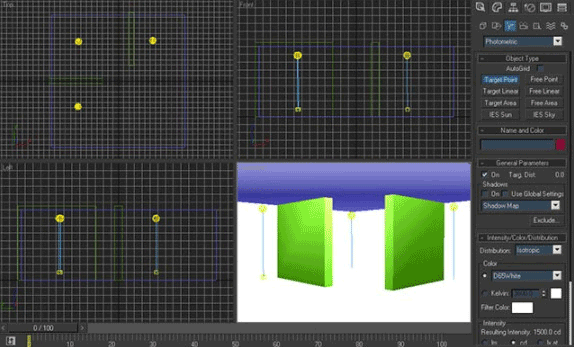
1. Create a new file or open the scene you want to put an IES light into. If you are working in a new file then create a box with inverted normals to create a sort of room for our scene. Here I have divided the box by partitions to try out different lights at once.

2. To create the lights go to Create Panel, click on Lights and select Photometric from the drop-down list. You can use IES files with any of the Photometric Lights in this list except IES Sun and IES Sky. So, click on any one of the lights and put it in the scene. Place the lights properly at desired locations. I have used Target Point lights in this scene.
3. Once the lights are properly placed at the desired locations, go to Modify Panel to see their Parameters. Go to the Intensity/Color/Distribution rollout and in the distribution list select ‘Web’. This is how we tell max that we want to use an external light profile file. Once you select ‘Web’ distribution, a new rollout is created called ‘Web Parameters’. In that click on the button called Web file. Browse for the IES file you want to use and select it and click Open.
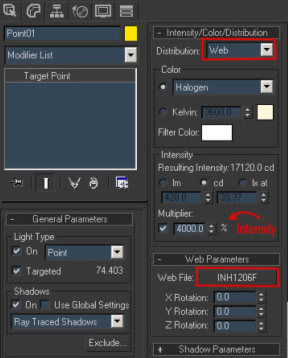
4. Once an IES file is loaded into the light, 3ds max will display its shape in the viewports. The final step is to set the intensity of the light according to your needs. You can set the intensity in lumen (lm), candela (cd) or lux (lx) or use the multiplier if you are not familiar with these units.

Hope this helps demystify IES and this piece of information useful enough to understand IES Lights. If you have any comments, suggestions, criticisms or any information that has been missed here then please let us know about it. Happy Lighting 😉